Showing posts with label Card. Show all posts

Thursday, June 2, 2011

TWO different color challenges!!!

Friday is ALMOST here!!!!

Today I want to invite you to join in the Scrapmaster's Color Combo Challenge.


Use this color combo for your project -be it a card, scrapbook LO, 3D or altered item. You do NOT have to use Stampin' UP brand colors or products, but you do have to use colors close to these colors.


Entries are due on Sunday, June 5th at 3PM EST. Next Monday, we will showcase the winner on the SPCC Blog


The winner this week will win TWO Digital Stamps from SP and Company stamps AND the opportunity to be our guest designer for an upcoming challenge.


I also have a card for the Simply Scrapping Crafts color combo challenge this week:


I stamped a woodgrain image onto some Kraft, die cut the jar and colored in the super fun candy....  The beautiful sentiment is from SP & Company - I think it's just perfect!


Thanks for stopping by today and I hope you will participate in BOTH color challenges!


Cardstock: DCWV, Kraft
Stamps: Papertrey Ink, SP & Company
Ink: VersaMagic, VersaMark
Other: Stampin Up Dimensionals
Tools: Trimmer (fiskars), ATG, Mini Scissors, Cuttlebug


Wednesday, June 1, 2011

SP & Company Group Post Wednesday

Hi and Happy Wednesday!

Check out the Scrapmaster's Blog today.  Not only does she have the list of the DT posts, but she will have some sneak previews of her stamps that are coming out this month!

I made a fun little card using a sweet SP and Company digi image.  From a distance, it looks pretty simple:


This is a wedding card, so I also thought the use of the I Love Love stamps fit perfectly!

Now take a closer look:


That Simple Wedding Cake is a fun digi image.  I wanted it to show through the window I created, but I wanted to soften it up, so I laid some vellum down first.


I paper pieced the cake inside so there is room to slip a check or cash behind the cake.  I also stamped the cake with some VersaMark Dazzle Frost Ink before coloring it in with Copics, so there was a slight glimmery resist happening. 


Above is the inside without anything tucked in behind the cake.  I added in the scalloped circle to pull it all together since the front of the card was also a scalloped window.

Thanks for stopping by today!


Cardstock: The Paper Compnay (Kraft), 80# Cougar Cover, Vellum (Unknown)
Stamps: SP and Company (I Love Love and Digi Image), Papertrey Ink
Ink: VersaMark Dazzle (Frost), Papertrey Ink (Fresh Snow)
Bling: Making Memories
Other: EK Success Punch, QuickKutz Dies, Copic Markers
Tools: Trimmer (fiskars), ATG, Stampin Up Dimensionals

Sunday, May 8, 2011

Girlie Girl Hop!

Hi!
Welcome to my blog! If this is your first time here, I am so happy you've decided to check it out.  And... if you're a 'regular,' welcome back!!!  Today I'm a part of the DeNami Blog Hop.  I can barely contain my excitement on this one.  The designs available at DeNami are just adorable! Let's get hoppin'!!!!


If you have arrived from Carol's Blog, you are going in the right direction!!!
And if you happen to get lost along the way, no worries, the blog starts over HERE!


DeNami May Blog Hop


THE DEETS:
 
When: The blog hop starts on May 8 at 6 AM, PST. However, you have until May 9, 2011, 11:59 pm PST, to leave comments on all the blogs (to be eligible for a prize).


Why: To be inspired by beautiful girlie creations featuring DeNami Design stamps and also the chance to win mini shopping sprees on the DeNami Design website!

Prizes: We are giving away THREE $20 gift certificates to our website! We'll be giving away one gift certificate to a random participant (DT members not eligible) and then we'll also be giving away TWO gift certificates to TWO people who comment along the hop!


Now, onto  the card I made! I wanted to go with a Shabby Chic feel.  I don't normally do the Shabby Chic thing, so I wanted to push myself a little bit. 


I used the super cute DeNami Sand Castle stamp and turned it into a Princess Castle.  I had my little daughter in mind when I made this one.  She has princess stuff everywhere, so it was probably on my subconsicious when I came up with this idea!  I used Copics to shade the castle and then punched it out.  The mats were created with Spellbinders Labels One and the banners that tie it all together were Papertrey Ink dies.  I distressed all of the edges and sponged over everything with some VersaMagic ink to give it that distressed/shabby feel.  Stickles and bling were added to give it a little bit of sparkle.

A close up for you:


Thanks for taking time out of your day to stop by my blog! I hope you will continue on with the DeNami Blog Hop - you have the chance to win if you leave comments along the way!!! Good Luck!!!!

Your next stop is Colleen Dietrich! 


Cardstock: DCWV (Patterned), The Paper Compnay (Kraft)
Stamps: DeNami (Castle Image G136), Hero Arts (Sentiment), Stampin Up (Confetti Flowers)
Ink: VersaMagic, VersaMark
Bling: Kaiser Craft (Flowers), The Paper Studio
Dies: Spellbinders (Labels One), Papertrey Ink (Banners)
Other: Stickles
Tools: Fiskars Trimmer, Stampin Up Dimensionals, Cuttlebug, Scotch ATG, Tim Holtz Edge Distresser

Friday, March 25, 2011

CS Designs Project TWO!

Now here is my second project for the CS Designs Big Extravaganza Contest!   To see the first project I made, click HERE!


For my second project, I wanted to make a card.  Using Lulu again (she's just too cute NOT to use her more than once), I created a card using my Copics.  Now, I don't have nearly as many as I'd like, so I usually have to just make-do with what I have.  Lots of times, I just give up and use colored pencils or watercolor pencils so I can get the exact color I'm looking for.  But this time, I had everything I needed.


I used some fun K& Company papers I just bought and black cardstock for the background.  After I colored Lulu in, I carefully measured out 1 inch squares, cut her apart, and then pieced her back together, leaving just a little space inbetween each image for a tiled effect.  Fun, no?


I was kind of scared to "Go Green" on her skin, but she's whimsical and obviously not human (unless there is someone out there that has wings?!), so I figured why not?! I actually really like the way she came out.  I had to give her red hair to go with that green skin!!!

Thanks for stopping by and make sure you check out the CS Designs Blog - you won't be disappointed!!!


CS Designs Contest!!!

I'm participating in the CS Designs Big Extravaganza Contest! Woo hoo!!! Chris Sterns is a fantastic artist and creates the most amazing digital art.  I was provided with Lulu and 4 sentiments for free, just for playing along.  I created two different pieces.  I'll share my first piece in this post - my second one will follow in a separate post.

First up:

I really wanted to re-purpose a mini candy box I've been holding on to.  It's the perfect size for a gift card - I was just watiting for the right project to come along.  Once I saw Lulu, I knew exactly what to do!!!


I first covered the candy box in some fun paper I've been waiting to use.  Then, I printed Lulu out, used some Spellbinders to die cut her out and colored her in with Prismacolor colored pencils.  I added some rhinestones to the background, inked it up and paper pieced her wings.  I also added Glossy Accents to them.  I really wanted to use glitter, but I decided to go with the glossy accents instead.  I also printed out the "Thinking of You" sentiment, punched it, and made the the center for the red flower in the upper corner.  I used a Making Memories tag frame and another flower for some fun accents.


Above is the box, opened, waiting for a gift card!!!  I really tried to push myself on this one with colors.  I love the combo of pink, red, teal and brown together, but I don't use it too often, so I forced myself to use it this time.

Thanks for looking and I'll have another project for you shortly!!!


Wednesday, March 16, 2011

A Quick Pop In with a Pop Up Card!

Sorry I've been away for a week.  I've been busy - I am now a member of the Sketch Design Team for Simply Scrapping Crafts, so I've been working on projects instead of my normal cards and challenges!!! I am so very excited to be a part of such an incredible group of crafters!!! If you aren't a part of the SSC Family, you should really check it out and join up!!! You will really be inspired and welcomed with open arms!

Today I have a pop up card that I created for an SSC Wednesday Card Challenge.  The challenge was to use a double bow.  The bow took me quite a while to perfect, but I was so proud of myself once I finally got the hang of it!!!


I also knew that I wanted to incorporate a pop up into the challenge.  I made a fun pop up card at the CHA last year, and ever since then, I've wanted to give it a try at home!  I used all PTI stamps.  I knew the Friendship Jar was the way to go.  I'm always looking for an excuse to pull that set out!!!


I colored in the pickles and jar with Copics and I added some Glossy Accents to the pickles.


This shows the outside and inside of the card, side by side.  The sentiment says,"Thanks for helping me out of a real pickle!"  Love it!!!

Thanks for stopping by today! I am going to post a tutorial of how I made this card on Simply Scrapping Crafts, so if you're interested, check it out!!!


Saturday, September 25, 2010

September Papertrey Ink Blog Hop

Fall is here!!!! For the Blog Hop this month (http://www.papertreyink.com/bloghop.html), we had to use a technique we learned from another stamper.  I decided to use the Cracked Glass technique I first saw on Heather Nichol's blog (http://http://www.pinefeather.typepad.com//).  I just love this look! Even though it can be a tad time consuming, I think the results are worth it!


I used the Vintage Picnic stamp set and colored them in with Copics.  I cut the image out and stamped it with VersaMark ink.  Then, I covered it with clear embossing powder and used a heat gun to heat the powder.  I re-embossed and heated four times.  I know that I should use the thicker embossing powder for this technique, but I don't have any! After the image is nice and thick and shiny, I bent it to crack the 'glass.'  Then, I went over the entire think with some distressing ink to fill in the cracks.  I wiped the excess ink off with a paper towel and voila - cracked glass!

I cut and dry embossed some Kraft cardstock with the totally awesome Woodgrain Impression Plate.  This was my first time using a PTI impression plate and it is the best that I've found! I was sooooo impressed with how well it came out! Then I die cut a window using the Mat Stack 3 die and I inked up the woodgrain to make it look real.  I attached the embellishment onto the inside with some more stamped images and I added a few pumpkins to the bottom corner of the card.


This is the first card I've made that is using strictly PTI products (with the exception of the paper).  Here is the finished product:


Thanks for looking and I'll see you in the forums later! I can't wait to check out all of the other projects!

Monday, August 30, 2010

Happy Birthday Cards

Today I wanted to share two birthday cards I made last weekend.  My niece and my brother-in-law both have birthdays in late August, so I had to make two cards.  The first one is the one I made for my niece.  I absolutely love cupcakes (who doesn't??!!), so I was pretty excited to use the cupcake set from Hero Arts.

I used my watercolor pencils to add some touches of color.  I finished the frosting and cherry off with Diamond Glaze.  For the card base, I die cut a circle in the center of the card and placed acetate behind it.  Then I covered up the glue on the inside with orange cardstock.


I stamped some sentiments on the front with VersaMark and some flowers in white ink.  I think this card is bright and fun, perfect for a birthday!!!


The second card I made was for my brother-in-law, so it had to be more masculine.  I used my new favorite stamp set from Papertrey Ink, Enjoy the Ride.  I colored in the car with watercolor pencils and used acetate again, but in a different form.


Diamond Glaze was also used again on the license plate and headlights.  I used some VersaMark to stamp some circles in the background and some black Staz-On for the sentiment on the acetate.  Here is the finished piece:


I hope everyone has a great week.  My family and I are moving this week into a larger home, so I'm not sure how much I will be able to post.  All of my scrapping items are packed (ICK!!!), but I do have a few cards that I haven't posted, so I will try to at least get those up.  Once we are moved in, I will actually have a scrapping ROOM, not just the Dining Room table, so I should be able to get more projects done!

Thanks for looking!

-Chrissie

Saturday, August 14, 2010

Baby Card

Tonight we are going out to dinner with our friends and they are expecting a baby boy in December! EEEEE!!! So, I figured I had to, at the very least, make them a card! Being that I just bought a ton of Papertrey Ink items, I couldn't resist using the "Enjoy the Ride" set.

First, I die cut the car outline and stamped it in black ink.  Then, I used my Copics to color it all in.  I finished it off with some Diamond Glaze for the window and headlights.


I added the sentiment in the upper left hand corner, tied a bow out of twine and inked the edges.  I also added a Congratulations sentiment in the inside.


Simple, but effective - my favorite type of design!!!

I'm planning on participating in the Waltzingmouse Blog Waltz for the first time this Tuesday, so check out the info on their blog (http://waltzingmouse.blogspot.com/2010/08/august-friends-of-waltzingmouse-stamps.html) to join in on the fun!

-Chrissie

Sunday, July 25, 2010

July Blog Hop


I am participating for the first time in Papertrey Ink's July Blog Hop.  The challenge was to create a project using office supplies using at least one PTI product (you can see the details here: http://www.papertreyink.com/bloghop.html).

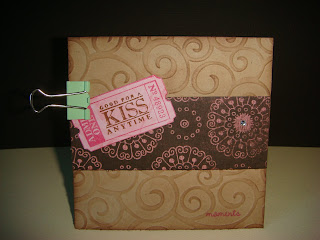
I created a mini card using a PTI stamp at the bottom (from the mini scrapbook series: tabs).


The binder clip is my office supply item and it holds the cute little ticket onto the card.  This just can't get lost - who wouldn't want to hang onto this little freebie?!


I embossed and distressed some Kraft cardstock and used BoBunny papers (with the addition of a little bling).  Here is the final piece:
 

Thanks so much looking! And to anyone that is also participating in the Blog Hop, thanks for looking and I'll see you on the forums later tonight!

-Chrissie