Showing posts with label Embossing. Show all posts

Sunday, March 8, 2015

Mix It Up Challenge!

Hi!
I'm playing along in the Mix It Up Challenge! Woo hoo! I was so excited when I saw this go live last week - I couldn't wait to play along!


I created a card using the Hero Arts Starburst Background stamp along with Ellen's brand new Bold Blooms Designer Dies.


To create this card, I stamped the burst in Peacock Feathers Distress Ink and then sprayed some water on it.  While it was drying, I heat embossed some Liquid Platinum embossing powder and the die cut the flowers and leaves from it.

To finish everything off, I added the sweet sentiment from Ellen's Hello Gorgeous set.  I love the scripty look!

Thanks for stopping by and I hope you'll join in on the challenge!


Stamps: Hero Arts, Essentials by Ellen
Dies: Essentials by Ellen
Ink: Distress Ink, Memento Tuxedo Black,
Paper: Cougar, Recollections
Adhesive: Collall Tacky Glue, Xyron Sticker Maker


Follow Me!
Follow on Bloglovin
 

Monday, June 2, 2014

Lawnscaping Challenge #83: Sponsored by Simon Says Stamp

Hi! It's time for another fabby Lawnscaping Challenge! Pull out those embossing supplies and get to it!!!


We LOVE the wonderful peeps over at  Simon Says Stamp! They are sponsoring this challenge with a $25 gift card to Simon Says Stamp!!!!


Simon Says Stamp Store Blinkie photo SSS_09_2103_zpsc2c6b992.gif

For my card, I used two types of embossing powders: white for the stars and silver for the sentiment.  I LOVE metallic powders...

The cutie unicorn is from Critters Ever After.  I embossed the stars in white and used a sponge to place Distress Ink over them.  The unicorn is colored in with Spectrum Noir pencils.


I hope you'll play along with us!!!


Follow Me!
Follow on Bloglovin
 

Thursday, January 30, 2014

You're a Rare Find!

I'm up on the Party Time Tuesdays blog today, re-sharing this Winter card I made! I live near Chicago, and it feels like Winter will never end here!!! :)

I used Lawn Fawn's Yeti Set Go set to create that little guy and Lawn Cuts Circle Stackables to make that window!


I brushed watercolors on the paper and then heat embossed some snowflakes from the Lawn Fawn Frosties set in clear embossing powder when it dried.

OK.  I used a heat gun to make it dry faster.  I think we all know I couldn't wait long enough for it to dry on it's own!!!


I used Spectrum Noirs (BT3, BT1, BT2, IG1, IG2, PP2) ro color everything in.


Head on over to the Party Time Tuesdays blog and follow us with Bloglovin! There is great inspiration there everyday!!!


Stamps, Dies: Lawn Fawn
Markers: Spectrum Noir
Embossing Powder: Ranger
Ink: Memento, VersaMark


Follow Me!
Follow Me on Pinterest

Friday, August 16, 2013

A Little Bit Magical Sneak

Hi! I am so in love with the newest Sheena set from Crafter's Companion! It is set to come out August 23 and you are going to love it! The collection is called 'A Little Bit Magical'.

I chose to use the stacked books image from the 'Knowledge set'.  I LOVE THIS STAMP.  I am such an avid reader (my husband lovingly calls me a bookworm), so as soon as I saw this, I felt like it was created just for me.


I used the Darice ABCs embossing folder for the background and lightly edged it with some Memento Delicata Golden Glitz (coming to the Crafter's Companion store soon!).


I felt like it needed a tassel to simulate a bookmark, so I created one using some Timeless Twine.  I fussy cut the books out, added some Golden Rod Stickles and then adhered them to the card with Foam Squares.

I used my fabulous Spectrum Noir makers to color the books in.  I used colors: GG1, GG2, TN3, TN7, BT6, BT9, BT3, BT4, EB4, EB6, GB6, GB4, CR7, CR9.


All supplies available at Crafter's Companion unless otherwise noted.

Not available on CC site: Twine (Timeless Twine), Patterned Paper (Lawn Fawn)

Thursday, June 27, 2013

Chalked Gift Box

Hi! I wanted to pop in and share a small gift box I created, using the Stamp It French Travels stamp set and the Gun Metal Embossing folder along with chalks. The box was a supplied box I had on-hand that I had (extras from a shower).


I stamped the image using VersaMark onto my Premium White paper.


Then, I grabbed my chalks and gently started brushing them over the image.


I used a few different colors - pinks and purples, then blended them together.


I fussy cut it out also embossed a strip.  Then I sprayed them both with Glitter Varnish to hold the chalk onto the paper and to give it some sheen.


I wrapped it around the box and adhered it all together.


It's simple and fun.  I love the French Travels set - it is so sophisticated! Thanks for stopping by today!


P.S. Google Reader goes away Monday! You can follow me using Bloglovin!!! I'd love it if you did!


Follow on Bloglovin


All products available on the Crafter's Companion website (minus the box)


Monday, April 1, 2013

Lawnscaping Challenge #55

Hi!
Want to know the best thing about Monday? It's time for another fab Lawnscaping Challenge!


Our guest designer this month is the one and only Jennifer McGuire!!! EEEEEEEEEEE! And we are sponsored by Simon Says Stamp (they totally rock)!  So, please go and show them both some love!!!! :)


Simon Says Stamp


For my card, I decided to mask off most of it and just stamp and color in one section of the card.


I combined some of the elements from the Summertime Charm set along with Critters in the Burbs.  I used my Spectrum Noir markers to color everything in and then ran part of the card through my Cuttlebug using a Lifestyle Crafts embossing folder.  I think it gives a nice whimsical effect!

Pop on over to the Lawnscaping Blog to see all of the inspiration from the Design Team and make sure to play along!!!

Thanks for stopping by and have a great week!


Stamps: Lawn Fawn
Cardstock: Neenah
Markers: Spectrum Noir
Ink: Memento Tuxedo Black
Embossing Folder: Lifestyle Crafts
Corner Rounder: Zutter


Thursday, January 20, 2011

A New Little Someone

Hi there!
I know it's been a while.  Our whole resolution of posting more has been an epic fail so far! But, I do have a lot of projects done that I haven't taken pictures of yet or that I'm submitting for publication so I can't share them right now.  So, there are promising things to come.  My December Daily is complete - I just need to take some pics and post!!!

But onto the card that I have for you today....


How cute is that butterfly? The stamp is from Inkadinkadoo.  I used some white embossing powder and cut out the little guy using a Fiskars trimmer.

This is the final card.  I used a Papertrey Ink die for the banner and the little card behind the butterfly and I stamped some more mini butterflies in the background on the cardstock.  All of the papers are from My Mind's Eye and the card base is Recollections cardstock.  Pop dots were used to adhere the butterfly onto the card and to give it a little something extra.  I wanted to keep this one clean and simple!

I made this for my best friend.  I have the card done, now we're just waiting for my little Goddaughter to arrive!!!!

Thanks for looking!

Sunday, July 25, 2010

July Blog Hop


I am participating for the first time in Papertrey Ink's July Blog Hop.  The challenge was to create a project using office supplies using at least one PTI product (you can see the details here: http://www.papertreyink.com/bloghop.html).

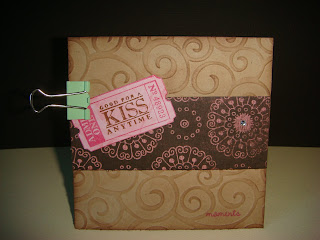
I created a mini card using a PTI stamp at the bottom (from the mini scrapbook series: tabs).


The binder clip is my office supply item and it holds the cute little ticket onto the card.  This just can't get lost - who wouldn't want to hang onto this little freebie?!


I embossed and distressed some Kraft cardstock and used BoBunny papers (with the addition of a little bling).  Here is the final piece:
 

Thanks so much looking! And to anyone that is also participating in the Blog Hop, thanks for looking and I'll see you on the forums later tonight!

-Chrissie