Showing posts with label Stitchery Doo Banners. Show all posts

Thursday, September 27, 2012

Poppy Field FALL!

Yep, you read that title right.  Poppy Field SUMMER is becoming Poppy Field FALL in this post! I'm here today to show you a pretty Fall card I created with a simple Post It Note mask.

I stamped the Lovely Labels frame onto a Post It Note and I punched out the center circle.  Then I stamped it again onto my patterned paper.  I lined up the punched/open area on the Post It to the stamped image and then I stamped the image from Poppy Field Summer onto it.  By using the Post It, it 'masked' out the part of the image I didn't want and only the partial image showed up inside the framed.  Cool, huh? That extra step of creating the mask on the Post It is totally worth it! And if you want to see more samples of masking, HERE is a picture tutorial on Sami's site that shows how to mask, step by step!


After I stamped the image, I outlined the poppy with a gray marker, just to make it stand out a little bit.  Then, I simply added some twine and stamped the cute sentiment from Stitchery Doo Banners down at the bottom to complete the card.


I think the masked image along with the light outline really gives that poppy some pop!!! Thanks for stopping by today!!!


P.S. Don't forget to apply for the SP Design Team! The calls ends on the 30th of this month! Deets HERE!


Monday, September 10, 2012

Trend Watching: Neon Love!

Hi There! I'm back again today with a CAS card to share.  Neon is all the rage right now, so I wanted to use an older set (Awareness is Empowering) to show off my neon love!

I simply stamped the ribbon onto cardstock, colored them in with some alcohol based markers (bright pink, yeah baby!) and cut it out.  For the little circle behind it, I stamped the scalloped circle from Stitchery Doo Banners (LOVE) and punched it out.  It worked perfectly with my 1 3/4" circle punch!I chose a patterned paper that was just blacks and greys so it wouldn't take away from the focal point - color.


I adhered everything with pop dots and stamped the sentiment below.  This one is CAS, but I love how the neon ribbon just pops!


So, what do you think? Have you hopped on the Neon Bandwagon yet????


Monday, June 11, 2012

A Masculine Birthday Card

Hi!
Today I have a fun birthday card I made for my husband's birthday using Chevron Chase, Bold Sentiments III: Birthdays, Stitchery Doo: Banners and some Echo Park Papers.


I stamped the Chevrons in watermark ink.  It's subtle, but I think it just works since I'm also mixing different patterns.


I thought it would be fun to pop the circles off the face of the card, but to still carry the chevron pattern through it.  So, I carefully lined up the circles and adhered them with foam adhesive after I punched them out.

I used Echo Park's This & That: Charming paper pack to add a little pizzazz and the banners are from Stitchery Doo: Banners.  This is a great masculine card (my husband doesn't exactly enjoy getting flowery cards!!!) with the plaid and polka dots.

Thanks for stopping by today!!


Stamps: SP & Company
Cardstock: Bazzill
Papers: Echo Park
Ink: Memento, VersaMark

Sunday, May 27, 2012

May All Your Dreams Come True!

Hi!
I have an awesome card for you today!!! I created the card below using Spellbinders dies (now available in the SP & Company Store!)to create that edge, Echo Park's Note to Self pack, along with Stitchery Doo Banners and the brand new Bold Sentiments III: Birthdays.

To create the soft coloring on the banner, I've created a video (it's at the end of this post)! I used colored pencils and Mineral Spirits.  I know Copics are hot and I do love using them, but I love my colored pencils so much, I can't help but go back to them over and over again.


I think the edge of the card is awesome.  I love that chevron-type edger die!


I finished the card off by adding some awesome twine and adhering the banners to the top left of the card.  Check out the video below to see how I created the colors on the banners or go HERE to watch it.


Thanks for stopping by today!!


Stamps: SP & Company
Stock: Papertrey Ink
Patterned Paper: Echo Park
Ink: Memento, Papertrey Ink
Twine: Divine Twine
Dies: Spellbinders

Wednesday, May 16, 2012

Bold Birthday Card

Hi!
Today I have a fun card for you today I created using the new Bold Birthday Sentiments!


This one is clean and simple, but fun.  I used the Large Polka Dots for the background and Stitchery Doo Banners to create the little award in the center.  The number is from Vintage Varsity Numbers (another one of my favorites).  That awesome sentiment is from the Bold Birthday Sentiments set.  There are sooo many awesome sentiments in this one.  I was thrilled when I first saw it - I knew right away this one would be a staple in my card-making!!!

To create the focal point, I stamped the scalloped circle (from Stitchery Doo Banners)onto patterned stock and cut it out.  Then I did the same with the banner tails.  I just added them to the card using some pop dots.


Thanks for stopping by today!


Stamps: SP & Company
Stock: Papertrey Ink
Patterned Paper: Lily Bee
Ink: Memento, Hero Arts

Wednesday, May 9, 2012

SP & Company May Blog Hop

Hi! Welcome to the SP & Company New Release Day Celebration and the Design Team Blog Hop!!!!

This month's color is Orange! After you're done hopping around today, make sure you play along with this month's Orange challenge (click here for details) for a chance to win some awesome SP and Company prizes!

Join us for our Release Celebration that is happening today and tomorrow on the SP Forum HERE.  You can talk to all of the designers, discuss projects and chit chat with other stampers!It's a blast and you don't want to miss out!


Don't forget that the random prize patrol is watching so leave a comment on every blog to be eligible for the prizes!! The more blogs you comment on, the better your chances are of winning something fun! Our GRAND PRIZE this month is one month in the SP 6x6 Stamping Kit Club! The grand prize winner will receive a newly released 6x6 paper pad from Echo Park + a newly released SP & Co stamp set as their kit.

Now, onto my projects!

For my first project, I created a mini album using the newest SP set, Bold Birthday Sentiments.  I LOVE this set! The sentiments are really so much fun and I always have a hard time finding good birthday sentiments I want to use for my cards.  My little one is turning 3 soon and I thought it would be fun to create a mini album that I can place some Instagram pics in later.  I really like the look of using cheap coasters and turning them into album covers.


I thought it would be fun to use my Spellbinders to make a frame and then to place real candles inside! I also added in some banners I stamped and cut from the Stitchery Doo Banners set.


I didn't have any pink bling, so I just used my Copics to alter the color.  I think this album is really fun and I can't wait to fill it in.  The finished size is 4 x 4, just perfect for those Instagram pictures.  And you better believe I'll be adding more stamps inside, too!!!

My second project is a simple card.

I used some spray mist in the background and I used the Birthday Sentiments stamp on Spellbinders die cut.  I created the rose using some punches.  I created a quick video to show how I made the rose.  This is my very first video, so please be gentle!  :-)  You can find it HERE or just click below.


Make sure you check out the SP Blog to see what Samantha did with the new stamps! And don't forget to hop around to each Design Team Member's blog - there are brand new projects with the stamps that came out TODAY to inspire you!

Here is the list of designers that will inspire you today:

Vicki 
Kelli
Michelle
Amber
Vera


Stamps: SP & Company
Papers: Stampin Up, Recollections, Basic Grey
Ink: Memento, PTI, Versa Magic
Dies: Spellbinders
Punches: McGill
Bling: Recollections

Tuesday, May 8, 2012

Bright and Fun Mini Cards

Today I want to share my project for Mini Card Week! Oh, how I love mini cards!!! The cards I created today are all fun and bright and I used my newest Spellbinders dies (Labels Four).  And don't forget that there are now Spellbinders dies available in the SP & Company store!

Here are the dies that I used, in action (well, not really in action, but right after they were in action):


Those fun papers are from Echo Park's Candy Shoppe Kit - *Swoon*! They are all 2-sided and  I love the look of the dots and stripes together.  For the pink one, I die cut the same frame twice and then die cut the center afterwards.  I used some pop dots to create a really cool frame.  I LOVE how it looks!


The joy of creating mini cards is that they are quick to do, and you can use your scraps since they are all small (which I did - ALL of these cards were made with scraps).

I made sure all 3 of my cards had similar elements (the sentiment from Stitchery Doo Banners was stamped on a die cut), but they all have different layouts.


I think this one is sooo fun! I love the different patterns all placed together.  I simply cut that yellow strip and added some tissue tape I had on hand, then placed the die a little off-centered onto the card.

One card done!


For this card, I stamped the grid from Journal This onto the base, cut the pink strip, sewed it onto the card and then placed the die cut onto the card.  Those little circles are from my All Zipped Up set.

Second card done!


For my last card, I stamped Large Polkadot at the top, and took some scraps and stamped the small banners from Stitchery Doo Banners.  I added that die cut and....

Card three done!


I love using mini cards to give as gifts, too.  It's so easy and fun to create little note cards and box them up! If you don't have a scoreboard to make the matching envelopes, I've seen them at all of my local craft stores and online, too.  

Thanks for stopping by today!


Stock: Echo Park
Stamps: SP & Company
Ink: Memento, VersaMagic, PTI
Dies: Spellbinders
Washi Tape: Queen & Co.

Saturday, April 21, 2012

Flowers in my Pocket!

Hi!
I want to share a really fun card I made with you today.  It's really unique and all it took were some SP & Company stamps, a punch and some creativity!

First, I pulled out a flower punch and punched several flowers out of yellow paper.


You can use any old flower punch you have - no need to use the same one.  Anything will do!!!


To make the flowers look real, I take a stylus and roll it around the flower.  This gives them a bit of a 3D element and makes them more realistic!


I added some glitter glue in the middle, but you can add bling, buttons or anything else your heart desires!


Look at all of those flowers!!!! My idea was to have them flowing out of a pocket, so I used the pocket stamp from All Zipped Up to achieve this.  Don't forget that there is a coordinating SVG to go along with this stamp!!!


Once I had my pocket stamped and cut out, I adhered it to some Kraft stock.  I sprayed some opaque paint on it first, just to spruce up the background a little bit!


I started stacked my flowers onto the card base and moved them around to look like they were spilling out.


For the finishing touch, I die cut a banner and added in the adorable sentiment from Stitchery Doo Banners.


So much fun - a pocket instead of a vase!!!!

Thanks for stopping by today!


Stamps: SP and Company
Stock: My Mind's Eye, Recollections (Kraft)
Ink: Memento, VersaMagic
Punch: McGill
Other: Stickles

Friday, April 20, 2012

Crafting by Designs Monochromatic Challenge

Today I am hosting the Monochromatic Challenge over at Crafting By Designs! I'd be lying if I said this one was easy for me.  I must have changed the colors (and stamps that I was using) at least 3 times before settling on this one.  I just couldn't find papers that I thought looked good together.  Oh, and I'm really indecisive, too. :-)


I stamped the flower with a Hero Arts stamp, cut it out and added Stickles to it for an extra pop.  I placed in onto a pre-made frame by Prima and a simple die cut I made using Spellbinders dies.  For the base, I painted some pink paint, sprayed it with Studio Calico mist and I then placed Washi tape on it.


Even though I really struggled with starting this one, I have to say I love the result!

Now, let's see what you come up with for this week's Monochromatic Challenge! Head on over to the Crafting By Designs site to participate!!!


Cardstock: American Crafts, Recollections, Authentique
Frame: Prima
Washi Tape: Hambly
Stamps: Hero Arts (flower), SP and Company (sentiment)
Dies: Spellbinders, Papertrey Ink
Ink: Memento
Other: Copic Markers, Stickles, SC Mister Huey's Spray Mist, Ranger Paint

Monday, April 16, 2012

Note To Self Date Book

Today I want to share a really awesome project with you.  Not only was it fun to make, but it will actually keep me (and you) organized! I've created a booklet to keep track of birthdays and other important dates.  It's small enough to fit into my purse so I can jot dates down in it whenever I think of them! I've created the inside pages to share with you today.  Just go HERE to download them for free.  Please only use them for personal use only and remember if you want to share them, send your friends over to this blog to find them!!!!


Print out the pages.  They should be 2-sided (so you might need to run them through your printer twice if it can't print two sides at once!).  Go ahead and trim them down to the crop marks.  The size will be 8 x 6.  Then trim your cover.  Make it a little larger than the inside pages.  For this, I made the size 8.5 x 6.5.  Score the cover and the pages you printed down the middle and lay them together.


 Make sure you have the pages in the correct order. Once the pages are folded, they will be 4 x 6.


I added a little bit of adhesive to the inside by the score lines, just to hold the book together temporarily.  Now, open your book to the center and get ready to sew! If you don't have a sewing machine, you can sew by hand instead or really lay on the adhesive to keep it together.


Now, don't freak if your sewing isn't perfect! We are going to cover the outside.  I chose to use some tissue tape, but you can use anything you want.


Not only does this cover up any imperfections, I love the look of a faux spine.  To decorate the front cover, I chose to use Echo Park's Note to Self collection.  This was part of the March Kit.


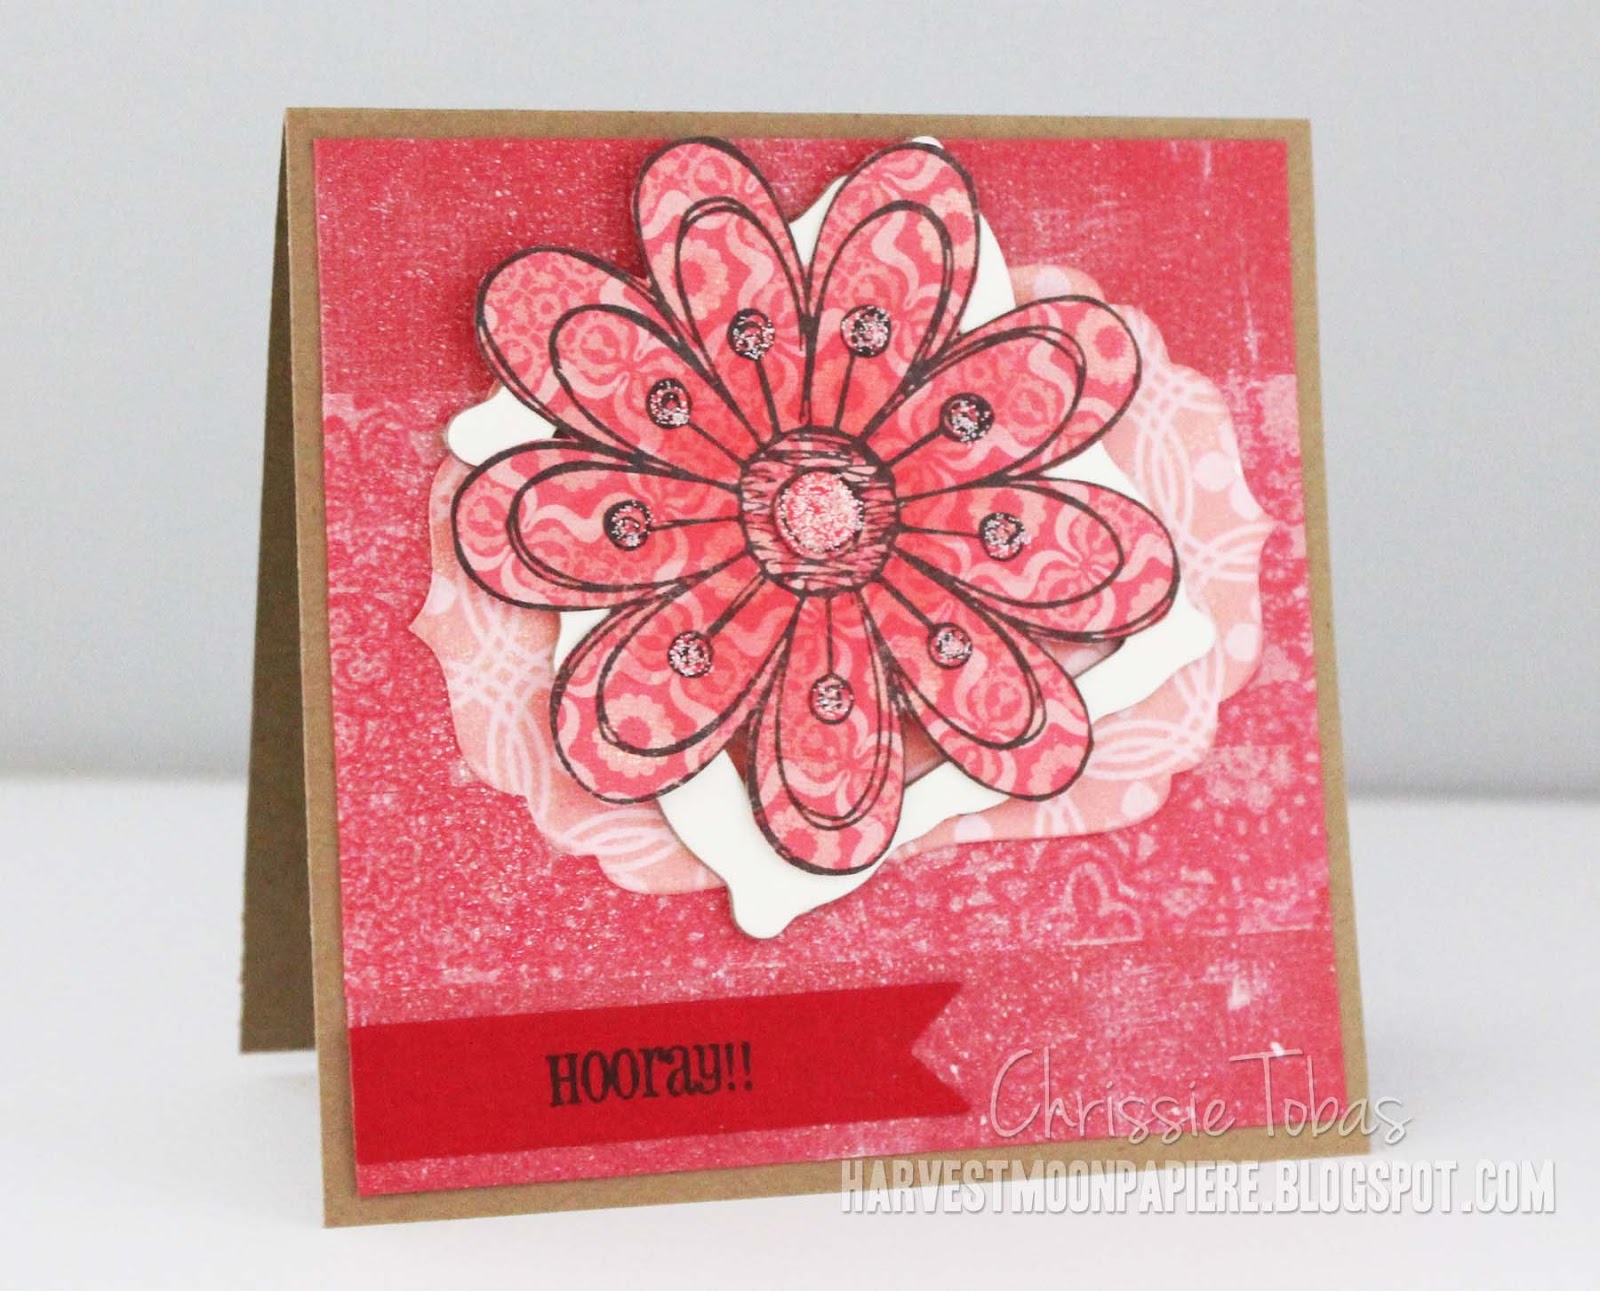
I used some stamps from Stitchery Doo Banners in the upper corner and I trimmed a few different patterns and placed them together towards the bottom.


I used some opaque spray mist, too.  I think it looks pretty cool on the Kraft stock!


I use an old shoebox for my ''spraying command center."  This way, I don't have splatters all over the place!


Here is the finished product:


Making your own journals like this is sooo easy.  You can combine tags, papers, envelopes, anything and just sew it together!!! Thanks for stopping by and if you create a journal like this one, please link it up so I can see it!


Stamps: SP & Company
Stock: Echo Park, Recollections (Kraft)
Ink: Memento
Spray: Studio Calico
Stickers: Echo Park
Twine: Divine Twine
Other: Singer Sewing Machine, ATG Gun, Supplied PDF